The Perfect Print Pt.3 - Making the print
/This final part of the perfect print is geared towards us that prints on our own or for those who wishes to learn about making a print, the secret settings and rituals will be revealed. That being said, for those of you who print at labs it can be beneficial in knowing the process especially the proofing process.
For the purpose of this article, we are going to make a print that is A3 size, have a fine art matte and printed on Canson velvet fine art paper.
I am using Adobe Lightroom and Serif Affinity Photo for my workflow, hence screen shots and workflow will be taken from these two applications. That being said you should be able to apply this process to other applications with some variances where the knobs and dials are located.
A word on proofing
Now that we have decided on what type of paper we are going to print on we can make a proof of our print. A proof, or print proofing refers to the process of making one or more test prints for initial selection that will become the final print.
But why should we do a proof at all, isn’t it enough to just click the print button?
What you need to understand is that when we look at our computer displays, these are backlit and high in contrast, our prints on the other hand are not, and papers come in different shades and brightness. This is where proofing comes in, it gives us a chance to compensate for the loss of brightness, contrast and sharpening before we make the final print.
You can choose to stick to one proofing method or use both together but whatever you do, you need to proof your prints.
Soft Proofing
Soft proofing allows us to get a simulation of how the final print will look once printed on the paper we selected without needing to actually print it. This can be quite useful so that we can get a better idea of how the print will look once printed. It is absolutely essential that you have calibrated your display for this to be remotely useful.
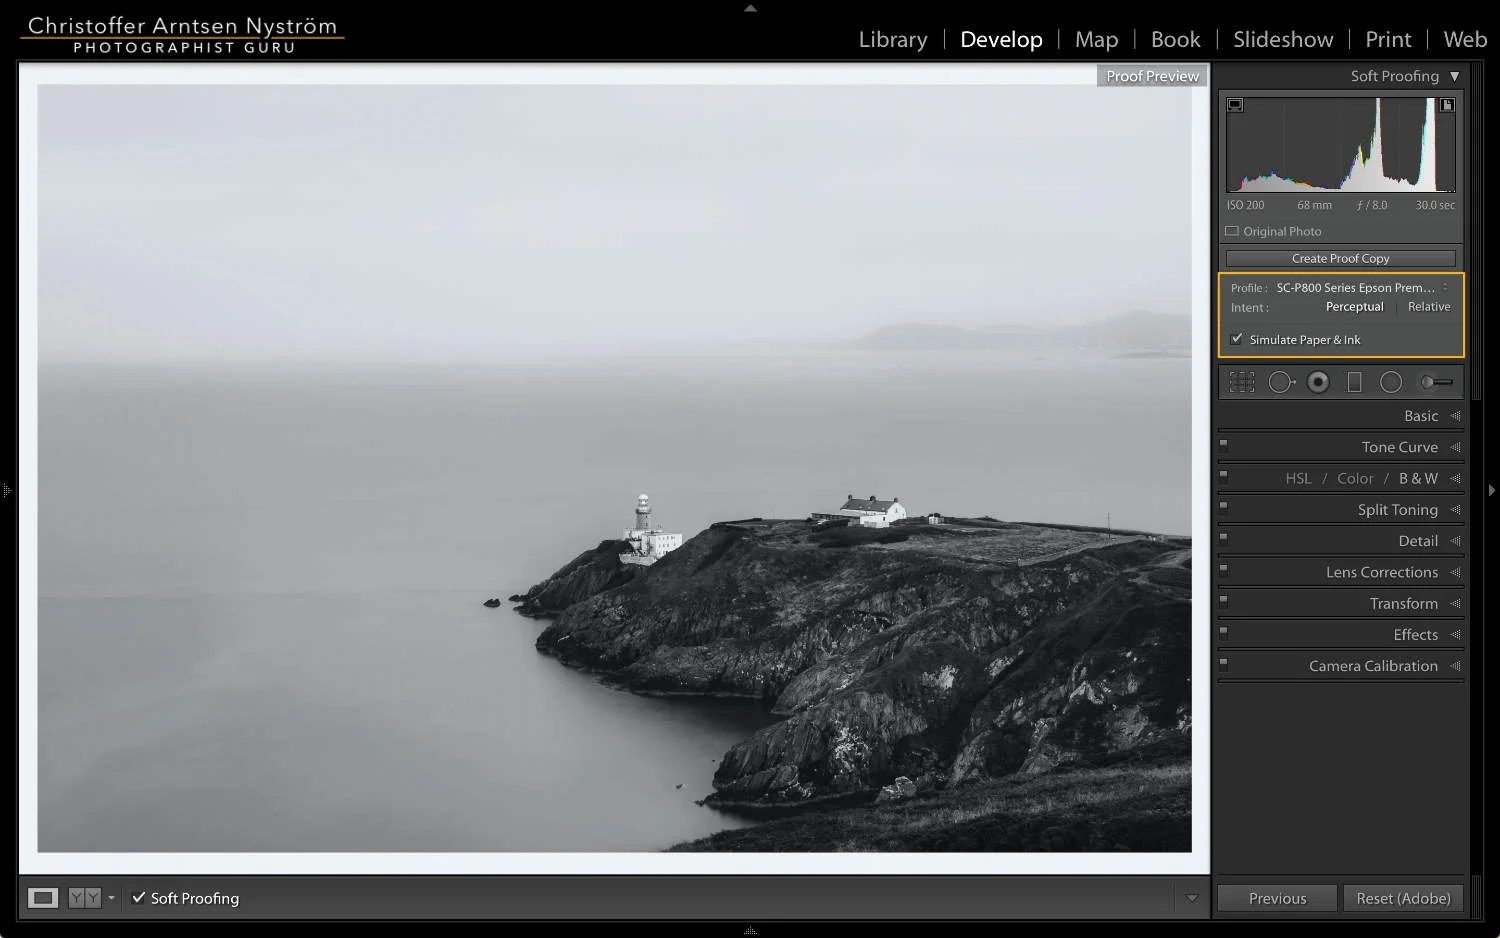
In Lightroom, soft proofing is accessed via the develop module by pressing the ’s’ key on the keyboard or by clicking the ‘Soft proofing’ tick box in the toolbar. Select the profile matching the paper you’ve chosen to print on and the rendering intent to get an approximation of how the photo will look once printed. While in soft proof mode, notice that Lightroom switches its background to white to simulate a paper and give a notification in the upper right saying, ‘Proof Preview’.
Below are examples of the original photo vs. different paper profiles in soft proof mode.
I will discuss profiles and rending intent more in-depth in the colour management portion of this article.
While in soft proof mode, we can now tweak our development of the photo for the specific paper we’ve chosen. You should also check that the photo is within the papers gamut by enabling the gamut warning. Anything that is turning red (colour photos), or grey (black & white photos), are out of gamut, meaning the printer will have a difficult time reproducing those specific areas accurately. As soon as we make a change, Lightroom will ask us if we want to make a virtual copy for this which I recommend you do. This way you still have the original development of the photo for general purpose use, and a second developed specifically for the paper we’ve selected.
The problem with soft proofing is, (especially if your display isn’t calibrated), that it’s not a 100% real representation of the actual print, it is still a simulation and we are still viewing the photo on a bright backlit computer display, this is where an actual print proof comes in.
Example of out of gamut colours for the selected paper profile in soft proof mode.
Print Proofing
The process I am now going to describe is not mine, I have learned this from Scott Kelby and it works wonders when print proofing. It is a bit more involved than the soft proofing and involves printing multiple versions of the photo on a single smaller sheet of paper. Our final size is going to be A3, while you can proof on the same size I use a smaller size, A4 or A5 with multiple proofs on one page which will save both ink and paper. You can use either the original development of your photo if you didn't soft proof otherwise use the soft proof version.
Use the same type of paper as you will use for the final print as well as ICC profile, rendering intent and print paper settings, otherwise the proofs won’t mean anything. I will discuss these settings in greater detail when making he final print.
The first step is to export four versions of the photo to be proofed using Lightroom's print module. Take the photo into the print module, then in the ‘Template Browser’ select the ‘Maximize Size’ template. In the ‘Print Job’ pane select to print to JPEG file with the quality set to 100 and sRGB profile.
Enable the ‘Print Adjustment’ and export four versions with brightness settings of 0, +20, +40 and +60 brightness. Name the files Base, +20% Brightness, +40% Brightness and +60% Brightness using the ‘Print to File…’ button.
Exporting for print proofing.
You can do the same with the contrast print adjustment or even combine the two, however I find it easier to tackle one slider at a time.
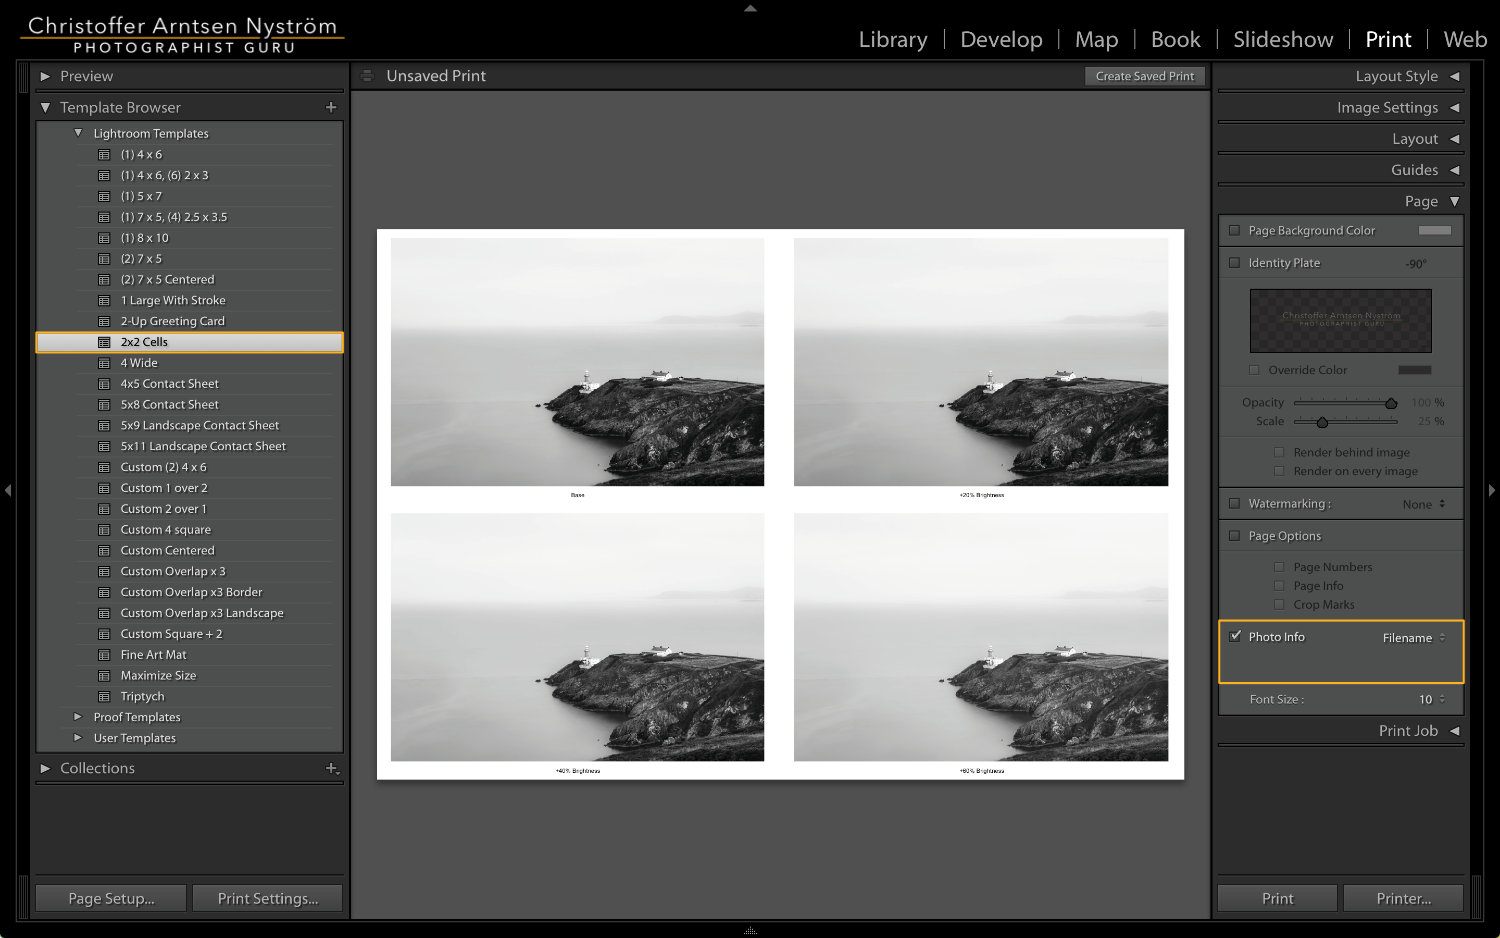
Now add the exported files back to Lightroom's catalogue and go back to the print module and select the ’2x2 Cells’ from the ‘Template Browser’. Select the four files and set ‘Photo Info’ to ‘Filename’ found in the ‘Page’ panel.
Expand the ‘Print Job’ panel and set print to ‘Printer’ and ensure you uncheck the print adjustment or reset the sliders to 0. Print and review the proofs and if needed go back and tweak the print adjustment settings and repeat the process until you find the settings that lines up with what you see on-screen and note the values down.
To speed up the proofing, tick the ‘Draft Mode Printing’ checkbox, you can still select the applicable paper, print settings and ICC profile via the ‘Printer…’ button, more details in the next section.
The final print
We’ve come to the moment where we will make the actual perfect print, we have done our development, we have selected our paper, figured out the optimal print resolution and done our proofing, everything is as it should be, it will be the perfect print.
Page Setup
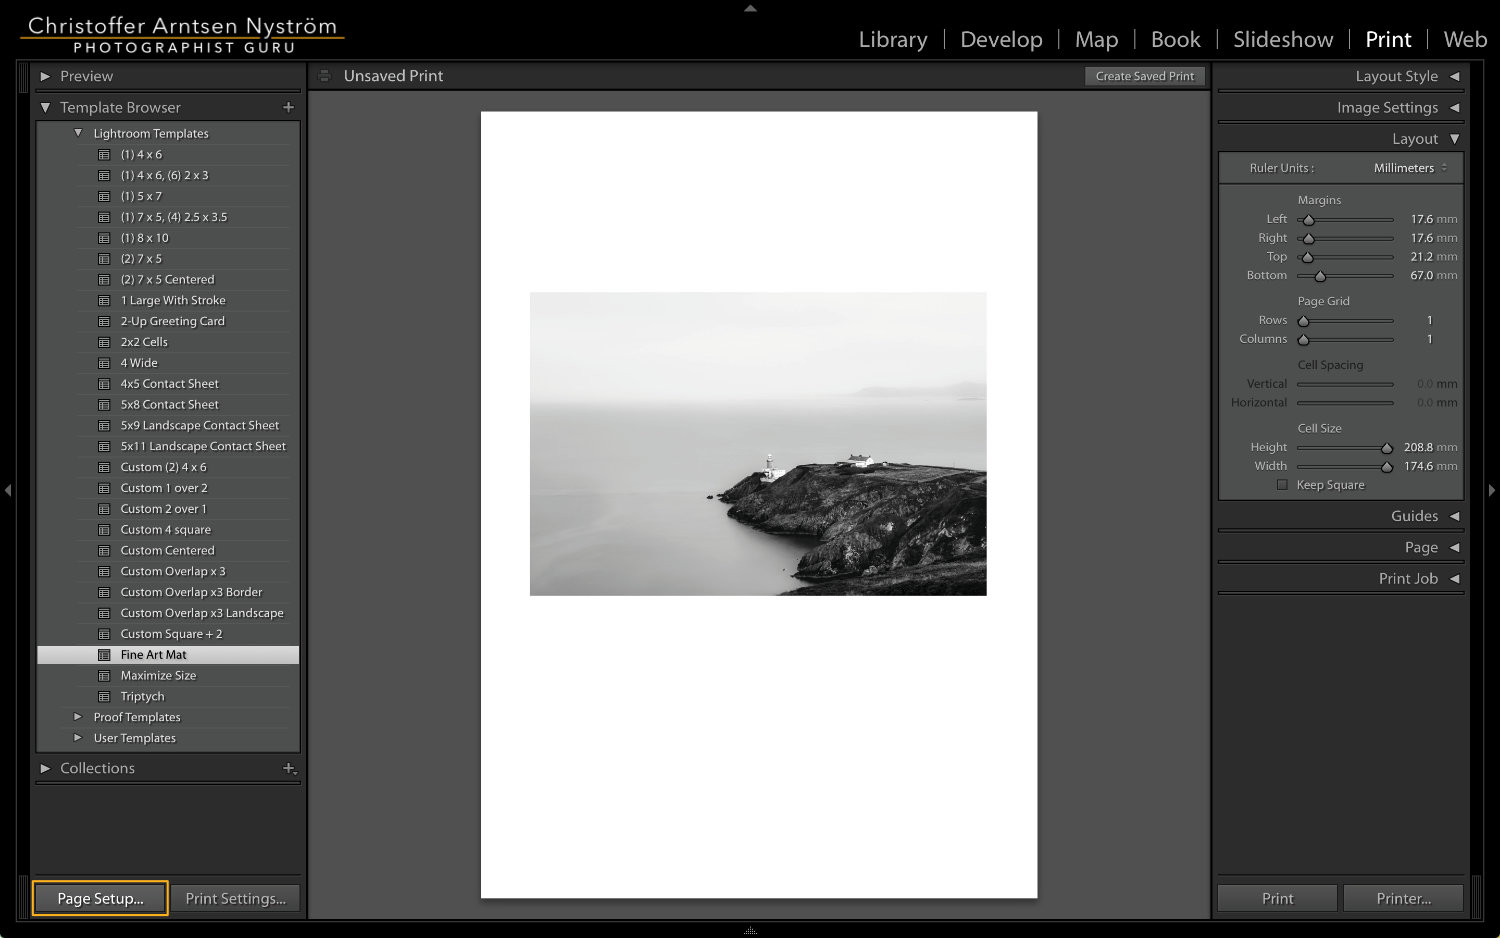
The first thing we need to do is to setup the printer with our page size and orientation. We do this by clicking on the ‘Page Setup…’ button in the lower left. In the ‘Page Setup’ dialogue select the printer you are printing to and the paper size and orientation then click OK.
Depending on what you printed earlier you may notice that the photo became much smaller or larger. This is because we chose a different paper size and you may find that you will need to adjust the cell size and margins to get a similar layout.
Print Settings
Next we need to select the paper we are printing to. Click the ‘Print Settings…’ button and then select ‘Print Settings’ in the print dialogue. Choose the paper source and the media type. If you are using 3rd party paper choose the closest fit from the list of available papers.
You may notice that the print driver will automatically select some of the print quality settings or ghost them out entirely depending on the media type selected, this is normal. Some paper media come with instructions from the manufacturer how you should configure these settings.
You can ignore the Color and Color Settings as we will set these from Lightroom's print job panel instead.
Windows printing dialogue will differ from the one shown and depending on printer and print driver you may notice differences. Consult your print driver for details how to set if different.
Print Job
We will now finalise the print by completing the print job settings in Lightroom and sending it to the printer.
Draft Mode Printing
Ensure draft mode printing is not enabled, this should only be used when you wish to draft or print a quick proof.
Print Resolution
Set the appropriate print resolution you calculated based on print size and viewing distance detailed in The Perfect Print Pt.1. This is set on the image properties of the file itself if using Affinity Photo or Photoshop like software.
Print Sharpening
Select the appropriate amount of output print sharpening and the correct media type based on your proofs. Alternatively if you opted to instead over-sharpen the photo during development for print, ensure you leave this option unticked. None Lightroom users should over-sharpen their photos.
16Bit Output
Select this option if you are printing to a 16-bit printer and using Mac OS X 10.5 or newer.
Colour Management
To maximise the print quality and to accurately reproduce the colours of an image we need to calibrate the printer for the paper that is being used. To do this we need to select the ICC profile matching the paper we are going to print on and it’s rendering intent, this process is called colour matching and is extremely important for both colour, and black and white prints.
Profile
Select the ICC profile matching the paper in the profile section. If you do not see the ICC profile in the list and it was installed correctly according to the instructions, the profile have not been added to Lightroom. To add the ICC profile click ‘Other…’ at the bottom of the profile list, then in the ‘Choose Profile’ pop-up window click the checkbox next to the profile(s) you need or want to be selectable then click ‘OK’ and they will appear in the Profile list. You may need to restart Lightroom before it shows up.
Intent
The rendering intent determines how colours in the photo’s source colour space (sRGB, AdobeRGB or ProPhoto RGB), is mapped to the papers destination profile colour space.
There is a total of four rendering intents however, only two are available in Lightroom, relative and perceptual. In other software, such as Affinity Photo, you have the ability to select any of the four rendering intents.
Absolute Colourmetric
This is typically the best match for colour accuracy as the white point and black point is not altered. Especially useful when needing to accurately reproduce colours of commercial products in print.
Relative Colourmetric
This converts colours that are out of gamut to the nearest possible colours within the given paper profile’s gamut. Colours already in gamut of the paper profile is left untouched.
Saturation
Aims to retain the brightness and saturation of colours as much as possible. Designed mainly for business graphics were exact colour match is not as important as having bright saturated colours.
Perceptual
Will compress the source profile’s colour gamut to the paper’s destination profile gamut by compressing the entire colour space including those already in gamut.
So what intent should you use?
Paper manufacturers will put the recommended rendering intent on their papers and in the ICC profile, which more often than not will be perceptual. That being said just like with choosing a paper we shouldn’t blindly follow the specification, you should instead choose what is best based on the photo, your vision and intended use.
ICC profiles are available for download from the paper manufacturer along with installation instructions. Some ICC profiles are installed with the print driver.
Print Adjustment
If you only did a soft proof you will not know for sure if you need to enter any print adjustment settings for brightness or contrast. In that scenario I would recommend to leave the print adjustment turned off as you likely developed a second version when doing soft proofing.
However, if you did do a print proofing, enter the values you arrived at during that proofing session. You will not see any change to the photo on-screen nor will Lightroom apply any changes to the file itself, it only affects the print.
If you do not require any print adjustment changes, simply leave the option turned off.
If you are not using Lightroom or the software doesn’t have a brightness & contrast controls for print, you may want to duplicate and develop a second copy of the image specifically for print.
Create Saved Print
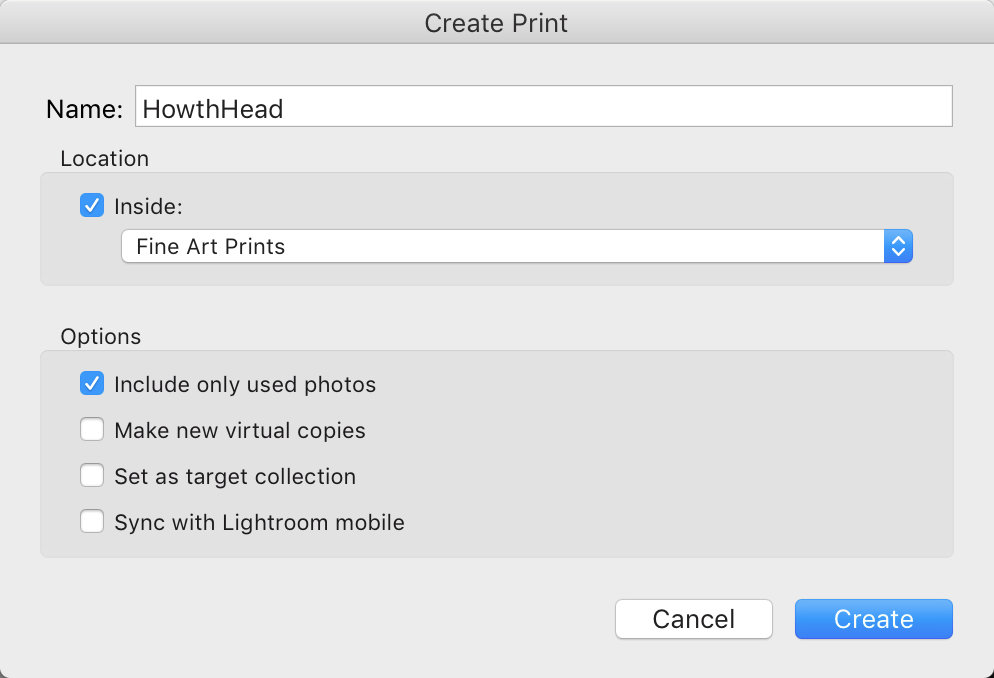
I highly recommend to create a saved print before printing the photo. Lightroom will save all settings you have done, from page setup, media types, cell sizes, page layout to print job settings, literally everything, into a saved print to a collection you specify.
Saving a print like this has huge benefits. You can now load your print up at anytime from the Library module by double clicking on it or on the arrow which will open the print with all settings and latest tweaks in the print module. No need to remember any settings, especially handy if you plan to only print a copy as needed.
Quick access to your saved print from the Library module loads all settings, just press print.
It should be noted that when you have a saved print selected in Lightroom's print module, any modifications to the print settings will instantly overwrite any previous settings!
Now all that is left to do is to press the print button and hover around the printer excitedly seeing your work come to life! Once printed leave the print to dry before mounting or applying coating.
If you make singed prints, sign using pencil. Pencil cannot be reproduced by computers or in print, thus making it less vulnerable to fraud. Some papers are however not appropriate to sign using pencil, in that case, ensure that your sign the print with a pen using archival ink.
But wait! I am not using Lightroom to print!
Fear not this process is not exclusive to Lightroom by any means and can be applied to any application outside of Lightroom’s borders. I am personally using Affinity Photo outside of Lightroom, as such the following slides explain how to setup the print using the native print dialogue via Affinity Photo but should be applicable to other applications as well.
Other software and operating systems may differ and depending on your printer and current print driver you may need to set the following settings in other places in the print dialogue.
Proofing
The same applies here as in Lightroom by applying a soft proof adjustment layer, select the icc profile and rendering intent. Click the check gamut box to ensure your colours are in gamut of the destination profile. If adjustments are needed add any adjustment layers underneath the soft proof layer and make adjustments as necessary.
Turn off or delete the soft proof layer before doing any printing or exporting.
Printing
There are two ways of printing from Affinity Photo, either open the photo and print directly from it or by creating a new document matching the size and print resolution of the print and adding the photo to that document. Doing the latter will give you more control in positioning the photo for final print.
From there the rest is the same as Lightroom, enter the print dialogue by pressing Ctrl+P, select paper size and orientation, colour matching and print settings. You are then ready to press print.
When using draft mode printing in Lightroom when proofing, you select the correct profile and paper by following the slides below.
The takeaway
While making a perfect print is an art in of itself, from capture in-camera to it ending up on paper is a journey and a highly rewarding one, at least it is for me. There is something special about a print that can never be reproduced by electronic photo frames or posting online.
To me there is something much more gratifying about the printed photo, it becomes the finished piece of art you have been perfecting and packaged into a finished product you can both see and touch, one that invokes an emotional connection that is not felt in any other way.
I hope the perfect print series have been informative and useful to you in your own print workflow.
Please share this article with your friends and feel free to comment or ask questions below.
Until next time keep perfecting your prints!


